Preparing the Neck and Shoulders for Deep
Work, Part II
Myofascial Techniques for the Superficial
Fascia
©
2008, Til Luchau, Advanced-Trainings.com
Part II: Releasing Superficial
Restrictions
Once you’ve seen or felt where your client’s outer layers
are tugging or creeping along with head and neck movement, you can go to work.
A word about sequencing your superficial work on the upper torso: in most
cases, you’ll begin by releasing the posterior restrictions of the upper back,
and end by working the anterior restrictions. This is the order we’re using in
this article. Why this back-to-front progression? Since most of us tend to have
our heads forward of the coronal midline, and be narrower across the front of
our chest than across our upper back, the anterior fascial layers of the chest
and shoulders tend to be shorter than the posterior layers of the shoulders and
back. Ending by lengthening the shorter anterior restrictions balances the
earlier work on the posterior side, and leaves the client with a greater sense
of anterior width, length, and freedom, and so helps with overall alignment. A
possible exception to this ordering: if your client has a very flat upper
thoracic curve, you may want to reverse the sequence, and end with work on the
back to encourage more spinal flexion.
1. Technique: Over the Edge
Ask your client to lie face down on your table, arms at the
sides, with his or her head and neck just over the top edge of the table. The
edge of the table should fall an inch or two below the top of the sternum. Your
client may need to adjust upwards or downwards a bit so that the edge is
comfortable. You won’t want to leave your client like this too long, but you’ll
usually have at least two or three minutes to work before his or her head
starts to feel too full.
Once your client is comfortable, ask him or her to turn the
head from side-to-side as you again watch or feel the outer tissue layers, in
order to re-check your findings. Look again at the up-and-down movements too,
again using care to avoid any neck compression with extension. Often, this
prone position will make the superficial restrictions even more obvious.
The tool we’ll use to release these restrictions is the flat
of our forearm; specifically, the first few inches of the ulna just distal to
the elbow. Use this tool to gently anchor the inferior margins of the places
you saw or felt superficial restrictions. We don’t use oil or cream, as we’ll
be using friction more than pressure to contact the layer we want to release.
Also, we won’t be sliding much—our client will provide the movement
needed for release.
Once you have the outer layers gently anchored with your forearm, ask your client to slowly turn his or her head away from the side you’re working. Feel for a direction of your pressure that gently lengthens the superficial layers being pulled by the head movement. Imagine that you’re helping your client lengthen and free herself inside the wetsuit-like outer layers of superficial fascia.
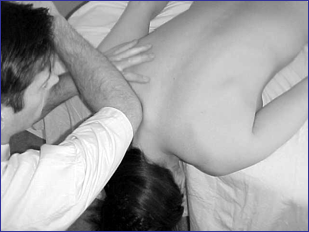
Figure 1: The
"Over-the-Edge" technique. Although relatively safe, head-down
positions are usually contraindicated for clients with uncontrolled high blood
pressure, a history or risk of stokes, vertigo, or acute sinus issues.
Alternatively, you can ask your client to lift and lower the
head (extend and flex the spine) as you lengthen the layers of the back
inferiorly. You’ll find that most release will happen on the eccentric phase of
the motion, that is, while your client is lowering his or her head.
Remember, your client will get uncomfortable you leave them
in this position for more than a few minutes. Although relatively safe,
head-down positions are probably contraindicated for clients with uncontrolled
high blood pressure, a history or risk of stokes, vertigo, or acute sinus
issues.
2. Technique: Lateral Core/Sleeve
Differentiation
After releasing the posterior restrictions of the back and shoulders’ superficial layers, you’ll want to broaden and continue this release by addressing restrictions in the lateral and posterior neck.
The tool we’ll use is the soft fist: rather than a hard, closed fist, the soft fist is open, easy and relaxed, with both the fingers and thumb out and relaxed (Figure 2: Lateral Core/Sleeve Differentiation. Gently use a soft, open hand to ease the outer layers of the neck posteriorly. Do not put any pressure on the underlying structures of the throat and lateral neck—the Styloid Process, Carotid Artery, and Vagus Nerve are all in this region and merit special care.). It is important to keep the wrist and metacarpals aligned with the forearm—this will both protect your wrist from strain or compression, and allow you to work less, and so make your touch more sensitive.
Using the proximal knuckles of your soft fist, catch the outer layers of the neck, just anterior and superficial to the SCM’s belly. By gently moving these outer layers posteriorly, you can take up any slack in the outer wrappings of the neck. There are delicate structures in the neck, so be sure you’re staying superficial. Think about just catching the outer collar of a turtleneck sweater (the superficial fascia), without putting any pressure on the deeper structures, or pulling the “collar” to tightly across the front of the throat. Your client should be comfortable—if he or she feels that you’re pressing too hard on neck structures or pulling too much on the front of the throat, readjust your pressure, layer, and direction until there is not discomfort.
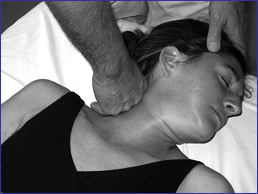
Figure 2: Lateral Core/Sleeve Differentiation. Gently
use a soft, open hand to ease the outer layers of the neck posteriorly. Do not
put any pressure on the underlying structures of the throat and lateral
neck—the Styloid Process, Carotid Artery, and Vagus Nerve are all in this
region and merit special care.
Once you’ve gently anchored and taken up the slack in the outer layers of the lateral neck, ask your client to gently turn his or her head away from the side you’re working. Your working hand stays static, and so any sliding is initiated by the client’s movement and tissue release. Make sure your client’s movement is slow and focused—“muscling through” the movement won’t help him or her learn an easier way of moving, and might even cause you both to miss the cues that keep your pressure safe. You can repeat this anchoring and turning in two or three places between the base of the neck and the base of the skull; and then on the opposite side.
This technique can also serve as a great finishing move: Ida
Rolf (the originator or Rolfing® structural integration) often used this
technique to make sure the neck was adaptable, long, and free at the end of his
or her sessions.
In Part III of this article, we'll look at a way to release the anterior
aspect of the neck and shoulder girdle.
Look for it in the next newsletter from Advanced-Trainings.com